# How to create a DID

In this library, you will learn how to register DIDs step by step — that is, the numbers that will be entered to be used for calls in Crocodial.

# How to access the page to register DIDs

First, you will need to access the following webpage: \[[http://sip-gw.croco-dial.net/admin/config.php\]](http://sip-gw.croco-dial.net/admin/config.php)  
  
**Warning: Ensuring that your VPN is activated.**   
Next.  
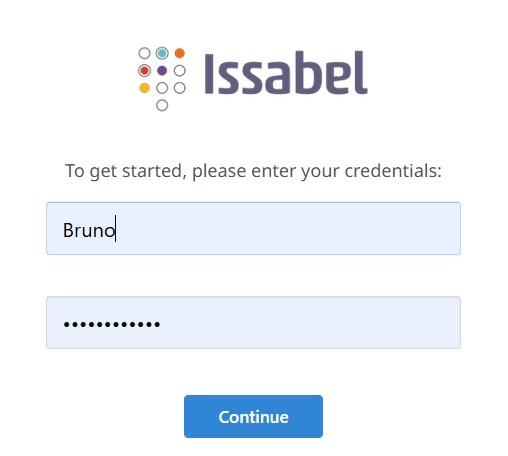
Click on the logo located at the center of the page, and log in using the credentials that have been assigned to you. Once completed, you will have successfully entered the site.

[![WBUimagen-de-whatsapp-2025-11-07-a-las-11-44-36-a3ec87c3.jpg](https://wiki.croco-dial.net/uploads/images/gallery/2025-11/scaled-1680-/wbuimagen-de-whatsapp-2025-11-07-a-las-11-44-36-a3ec87c3.jpg)](https://wiki.croco-dial.net/uploads/images/gallery/2025-11/wbuimagen-de-whatsapp-2025-11-07-a-las-11-44-36-a3ec87c3.jpg)

[![Imagen de WhatsApp 2025-11-07 a las 11.47.27_c7c7b469.jpg](https://wiki.croco-dial.net/uploads/images/gallery/2025-11/scaled-1680-/imagen-de-whatsapp-2025-11-07-a-las-11-47-27-c7c7b469.jpg)](https://wiki.croco-dial.net/uploads/images/gallery/2025-11/imagen-de-whatsapp-2025-11-07-a-las-11-47-27-c7c7b469.jpg)

# How to create the DIDs registry

In this case, you will need to follow a series of steps designed to create the DID extensions.

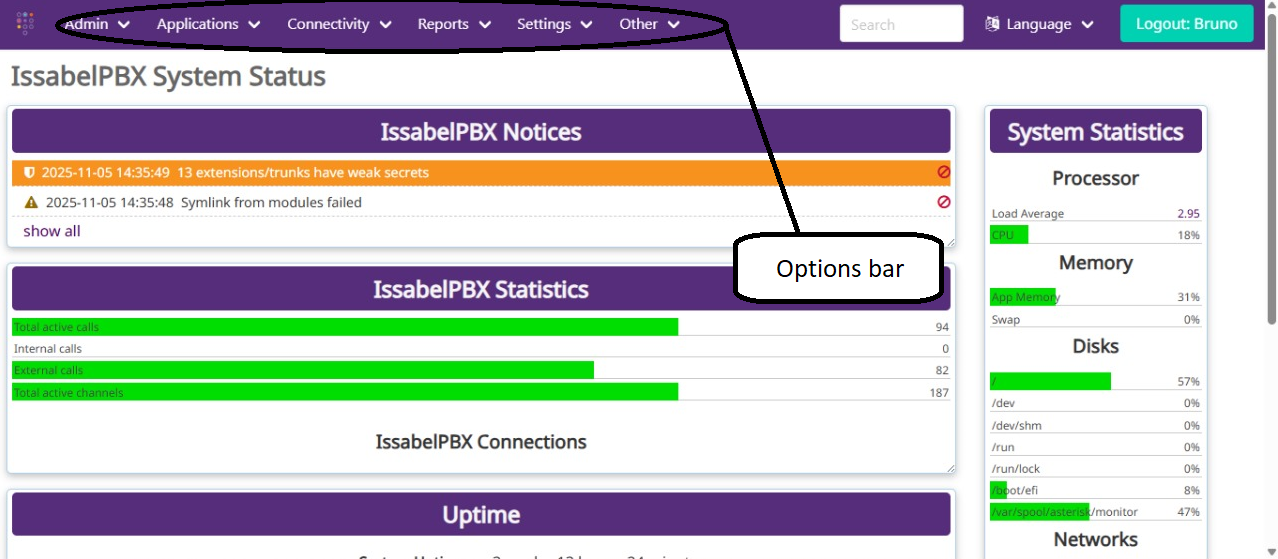
As the first step, once you are inside the IssabelPBX webpage, locate the options menu situated on the top navigation bar of the page.

[![image.png](https://wiki.croco-dial.net/uploads/images/gallery/2025-11/scaled-1680-/Rzdimage.png)](https://wiki.croco-dial.net/uploads/images/gallery/2025-11/Rzdimage.png)

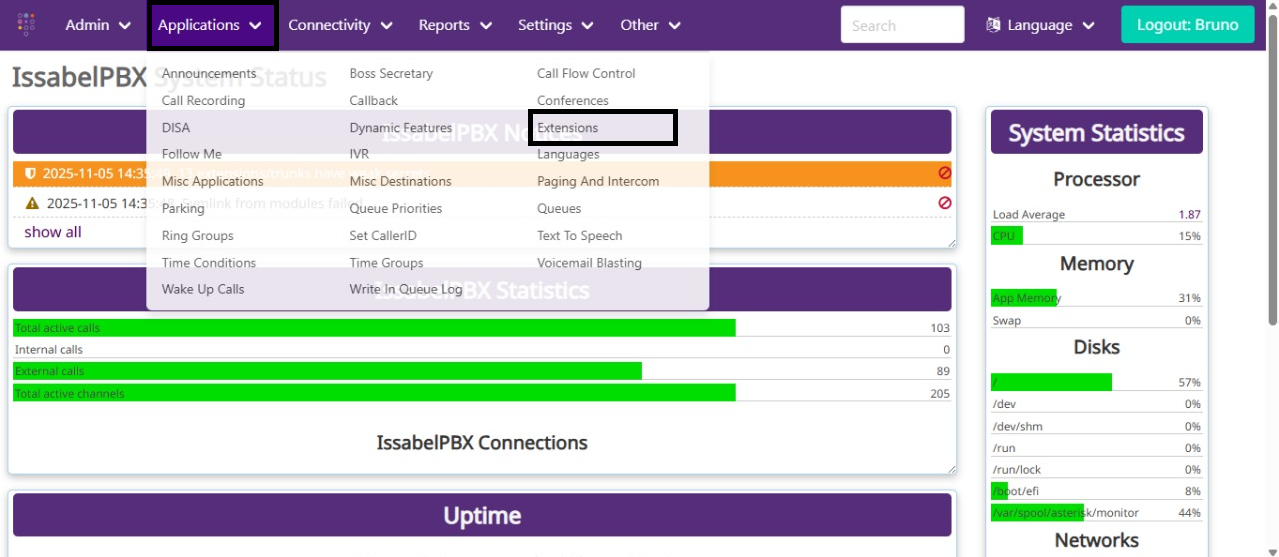
You will need to open the **“Applications”** option, which will display a multi-option menu. From this menu, select the **“Extensions”** option.

[![image.png](https://wiki.croco-dial.net/uploads/images/gallery/2025-11/scaled-1680-/Udqimage.png)](https://wiki.croco-dial.net/uploads/images/gallery/2025-11/Udqimage.png)

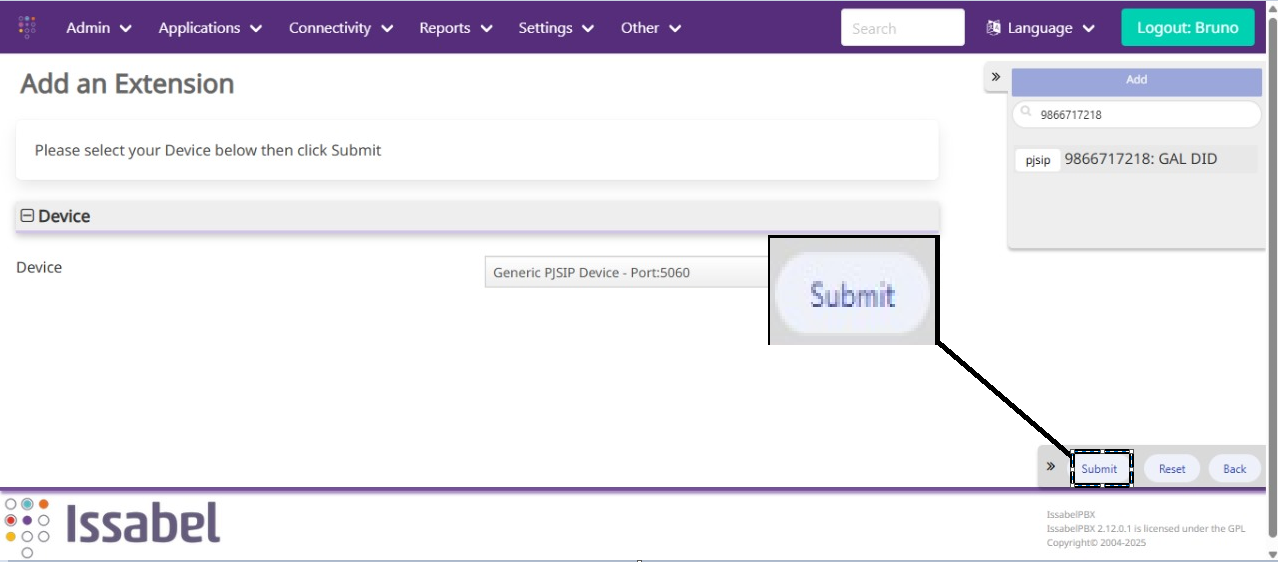
Once you are inside the **“Extensions”** section, you will need to click the **“Submit”** button to begin the first step in the extension setup process.

[![image.png](https://wiki.croco-dial.net/uploads/images/gallery/2025-11/scaled-1680-/PGUimage.png)](https://wiki.croco-dial.net/uploads/images/gallery/2025-11/PGUimage.png)

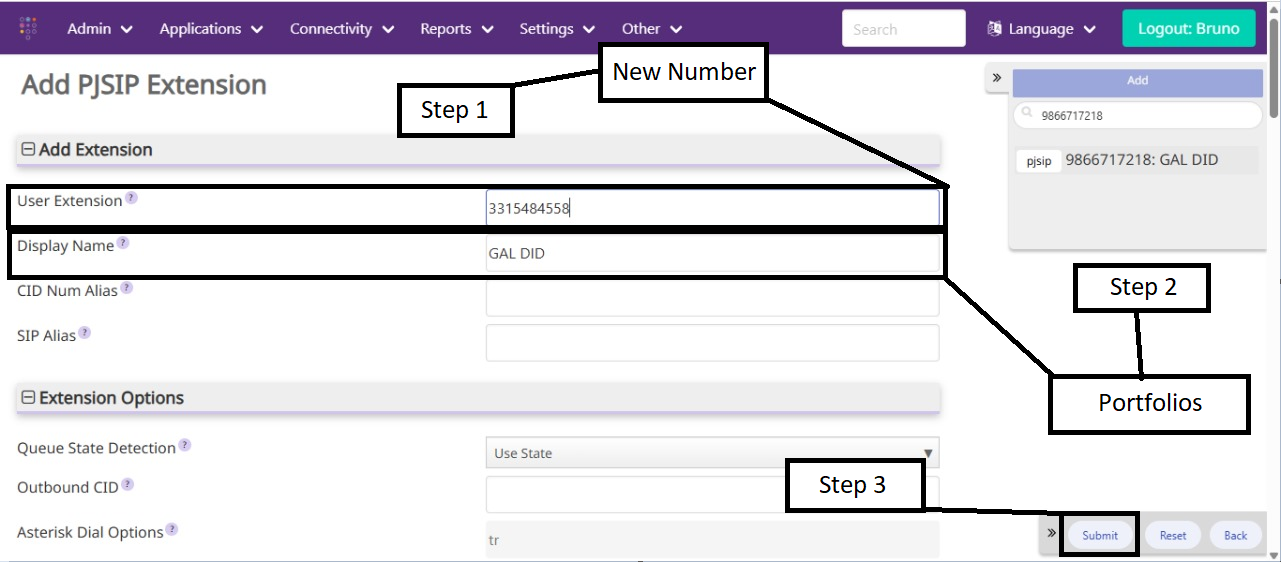
Once inside, you will need to fill in the **“User Extension”** and **“Display Name”** fields with the information that has been assigned to you. In the **“User Extension”** field, enter the new number, and in the **“Display Name”** field, enter the corresponding portfolio. To complete this step, click **“Submit”** to temporarily save this part of the process. However, please note that pressing **“Submit”** does not permanently save the changes. Proceed with caution, as I will explain how to fully save the configuration in later steps—this action only secures the changes for the ongoing setup process.

[![image.png](https://wiki.croco-dial.net/uploads/images/gallery/2025-11/scaled-1680-/LR1image.png)](https://wiki.croco-dial.net/uploads/images/gallery/2025-11/LR1image.png)

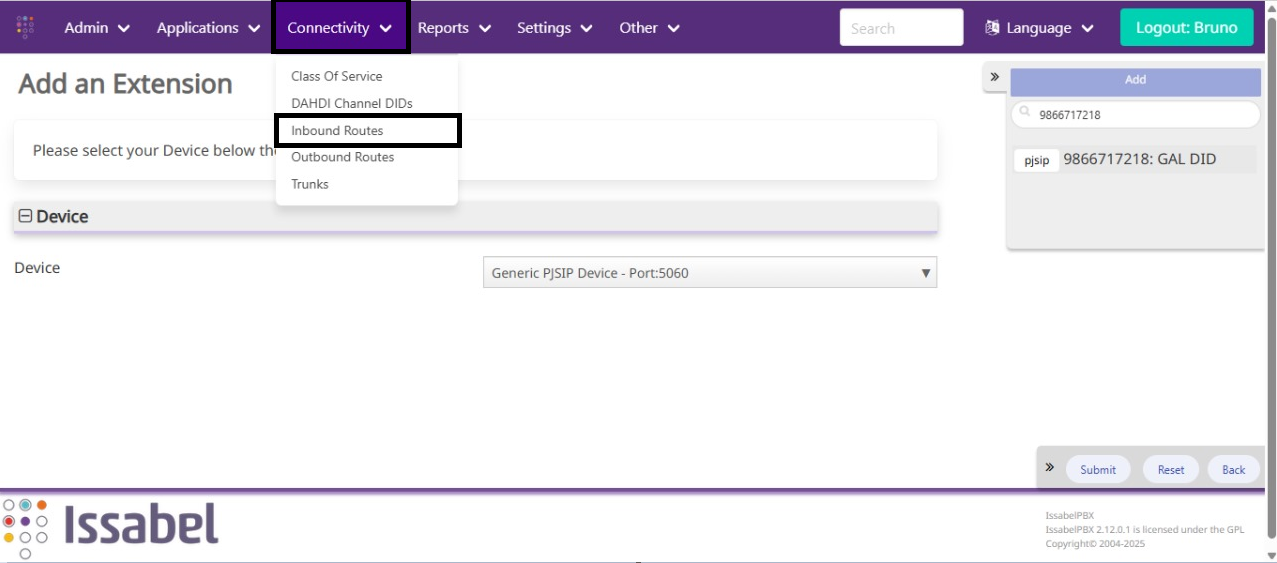
Despues de presionar sumit la pagina te regresara al principio y esta vez seleccionaras la opcion de <span style="text-decoration: underline;">Connectivity</span> y se te abrira otra barra de opciones donde seleccionaras <span style="text-decoration: underline;">Inbound Routes</span>

[![image.png](https://wiki.croco-dial.net/uploads/images/gallery/2025-11/scaled-1680-/oe4image.png)](https://wiki.croco-dial.net/uploads/images/gallery/2025-11/oe4image.png)

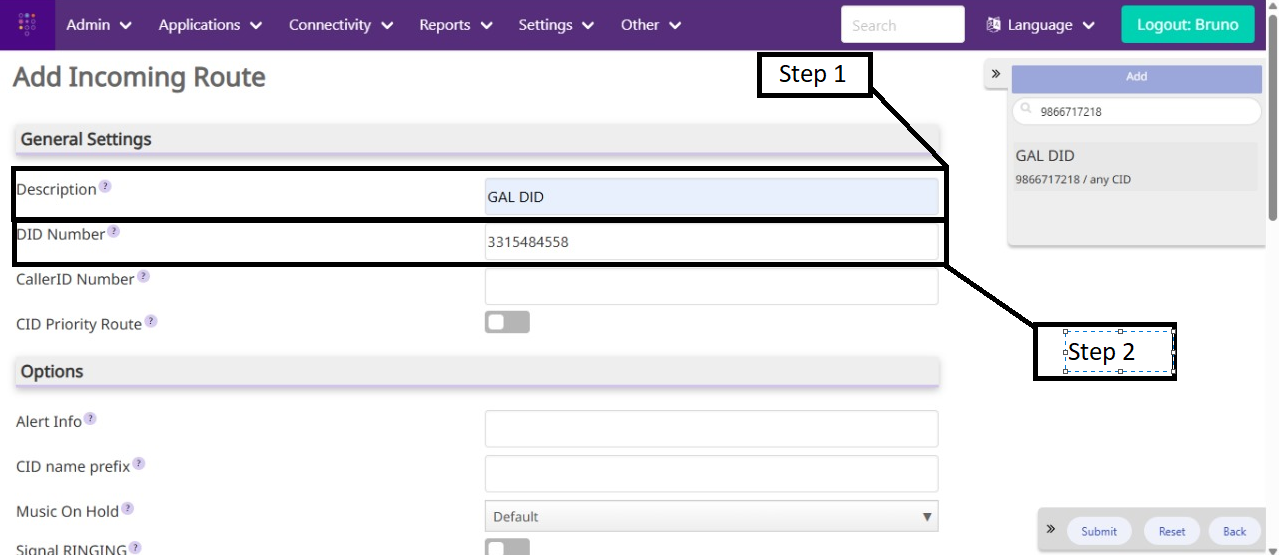
When you access the **Inbound Routes** section, you will need to complete four fields — the first two are located under **General Settings**, and the last two under **Set Destination**.

The first two fields to fill out are:

- **Description:** Enter the portfolio corresponding to the number.
- **DID Number:** Enter the new number you are currently working on.

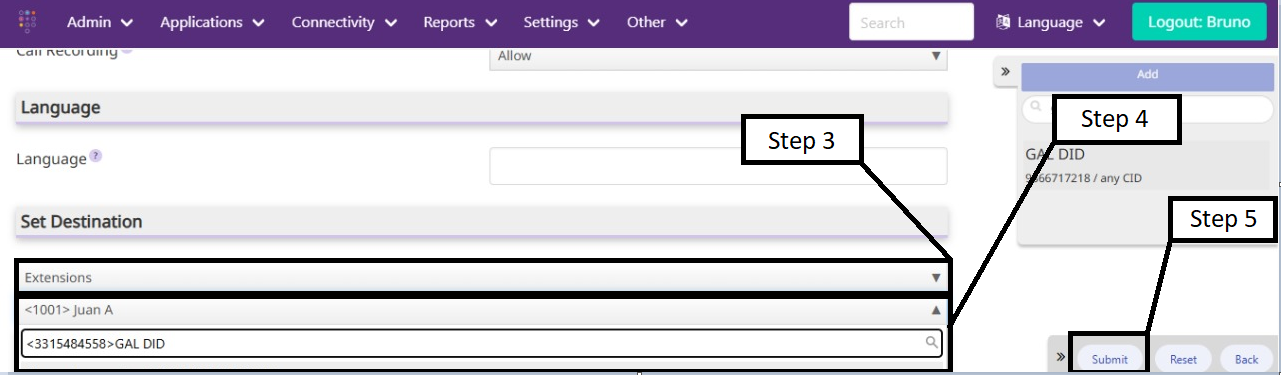
Next, scroll down to the bottom of the page to find the **Set Destination** subsection. There, you will need to fill in two additional options:

- In the first option, select **“Extensions.”**
- In the second field, enter the same number used in the previous steps (it is not necessary to include any special characters—typing only the number will display the corresponding option).

Finally, click **“Submit”** to save the changes made.

[![image.png](https://wiki.croco-dial.net/uploads/images/gallery/2025-11/scaled-1680-/0oTimage.png)](https://wiki.croco-dial.net/uploads/images/gallery/2025-11/0oTimage.png)

[![image.png](https://wiki.croco-dial.net/uploads/images/gallery/2025-11/scaled-1680-/uVvimage.png)](https://wiki.croco-dial.net/uploads/images/gallery/2025-11/uVvimage.png)

Once the number has been registered, return to the main page. Then, click on **“Applications”** again and select **“Extensions.”** You will notice that, in the upper-right corner of the page (just below the **“Logout”** button), there is a search field. In that field, enter the number you are currently working with. When the corresponding number appears below, select it to continue.

[![image.png](https://wiki.croco-dial.net/uploads/images/gallery/2025-11/scaled-1680-/5rMimage.png)](https://wiki.croco-dial.net/uploads/images/gallery/2025-11/5rMimage.png)

After selecting the number, several tables will appear. Locate the one labeled **“Device Options.”** Within this table, you will find a field called **“Secret.”** The content of this field will appear blurred until you hover your cursor over it.

Using the information you have obtained, you will now need to create the registration string. Follow these steps carefully:

1. **Insert the number** you are registering at both the beginning and end of the string:  
    `3315484558----------------3315484558`
2. **Add the password** you retrieved from the **“Secret”** field in the middle:  
    `3315484558:381af6662eef9a2db11f4cd8003809fc------3315484558`
3. **Include the server address** as follows:  
    `3315484558:381af6662eef9a2db11f4cd8003809fc@sip-gw.croco-dial.net/3315484558`

Finally, to simplify the registration process in the future, add the prefix **“register =&gt;”** before the entire string:  
`register => 3315484558:381af6662eef9a2db11f4cd8003809fc@sip-gw.croco-dial.net/3315484558`

[![Imagen de WhatsApp 2025-11-07 a las 16.08.01_6fbbfe6b.jpg](https://wiki.croco-dial.net/uploads/images/gallery/2025-11/scaled-1680-/imagen-de-whatsapp-2025-11-07-a-las-16-08-01-6fbbfe6b.jpg)](https://wiki.croco-dial.net/uploads/images/gallery/2025-11/imagen-de-whatsapp-2025-11-07-a-las-16-08-01-6fbbfe6b.jpg)

# How to add DIDs to the server

<article class="text-token-text-primary w-full focus:outline-none [--shadow-height:45px] has-data-writing-block:pointer-events-none has-data-writing-block:-mt-(--shadow-height) has-data-writing-block:pt-(--shadow-height) [&:has([data-writing-block])>*]:pointer-events-auto [content-visibility:auto] supports-[content-visibility:auto]:[contain-intrinsic-size:auto_100lvh] scroll-mt-[calc(var(--header-height)+min(200px,max(70px,20svh)))]" data-scroll-anchor="true" data-testid="conversation-turn-4" data-turn="assistant" data-turn-id="request-WEB:6513b70d-6037-4add-ac0b-604ac86c365d-1" dir="auto" id="bkmrk-first%2C-you-will-need" tabindex="-1">First, you will need to access the **Terminus** application. Once inside, add or open the **server** to which the **DIDs** will be assigned.

**Warning:** Make sure the corresponding **VPN** is activated before proceeding.

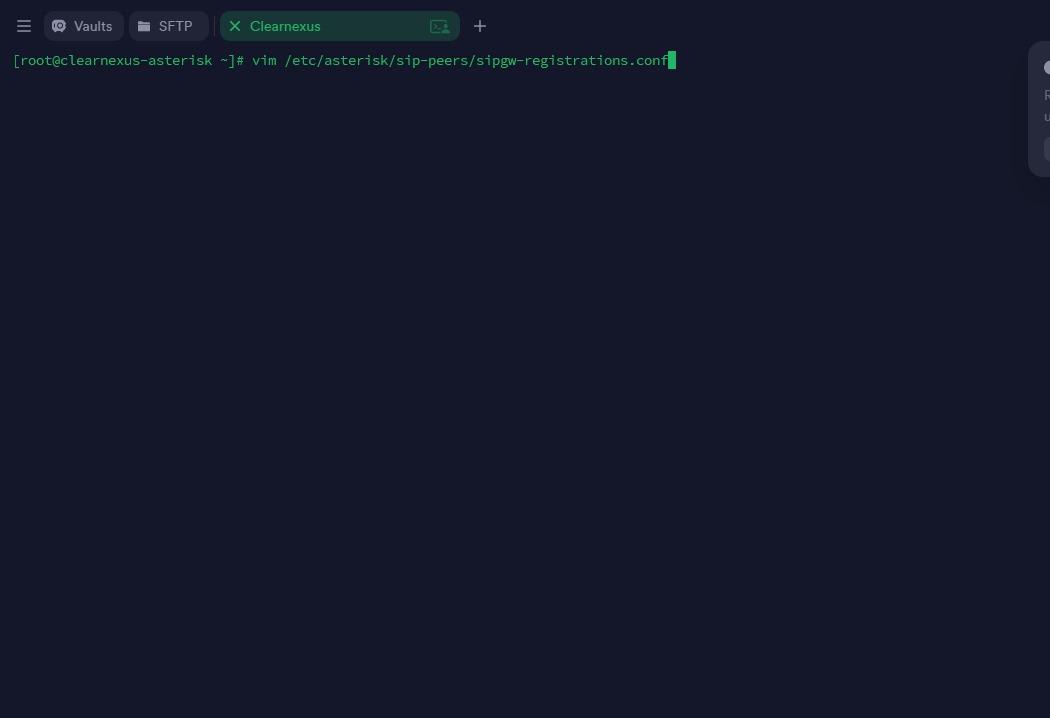
Once you are in the server terminal, you must verify that the **registration strings** exist. To do this, enter the following path in the terminal:

<div class="text-base my-auto mx-auto pb-10 [--thread-content-margin:--spacing(4)] thread-sm:[--thread-content-margin:--spacing(6)] thread-lg:[--thread-content-margin:--spacing(16)] px-(--thread-content-margin)"><div class="[--thread-content-max-width:40rem] thread-lg:[--thread-content-max-width:48rem] mx-auto max-w-(--thread-content-max-width) flex-1 group/turn-messages focus-visible:outline-hidden relative flex w-full min-w-0 flex-col agent-turn" tabindex="-1"><div class="flex max-w-full flex-col grow"><div class="min-h-8 text-message relative flex w-full flex-col items-end gap-2 text-start break-words whitespace-normal [.text-message+&]:mt-1" data-message-author-role="assistant" data-message-id="e329aaf8-23c0-41b2-80b1-2f911fec1e22" data-message-model-slug="gpt-5" dir="auto"><div class="flex w-full flex-col gap-1 empty:hidden first:pt-[1px]"><div class="markdown prose dark:prose-invert w-full break-words light markdown-new-styling"><div class="contain-inline-size rounded-2xl relative bg-token-sidebar-surface-primary"><div class="sticky top-9"><div class="absolute end-0 bottom-0 flex h-9 items-center pe-2"><div class="bg-token-bg-elevated-secondary text-token-text-secondary flex items-center gap-4 rounded-sm px-2 font-sans text-xs">  
</div></div></div><div class="overflow-y-auto p-4" dir="ltr">`vim <span class="hljs-regexp">/etc/</span>asterisk<span class="hljs-regexp">/sip-peers/</span>sipgw<span class="hljs-operator">-</span>registrations.conf`</div></div></div></div></div></div></div></div>After entering this path, you should see the existing registration records.  
If no records are found, they must be created (please notify the team in this case).

</article> [![WhatsApp Image 2025-11-10 at 10.27.10_a67ee903.jpg](https://wiki.croco-dial.net/uploads/images/gallery/2025-11/scaled-1680-/whatsapp-image-2025-11-10-at-10-27-10-a67ee903.jpg)](https://wiki.croco-dial.net/uploads/images/gallery/2025-11/whatsapp-image-2025-11-10-at-10-27-10-a67ee903.jpg)

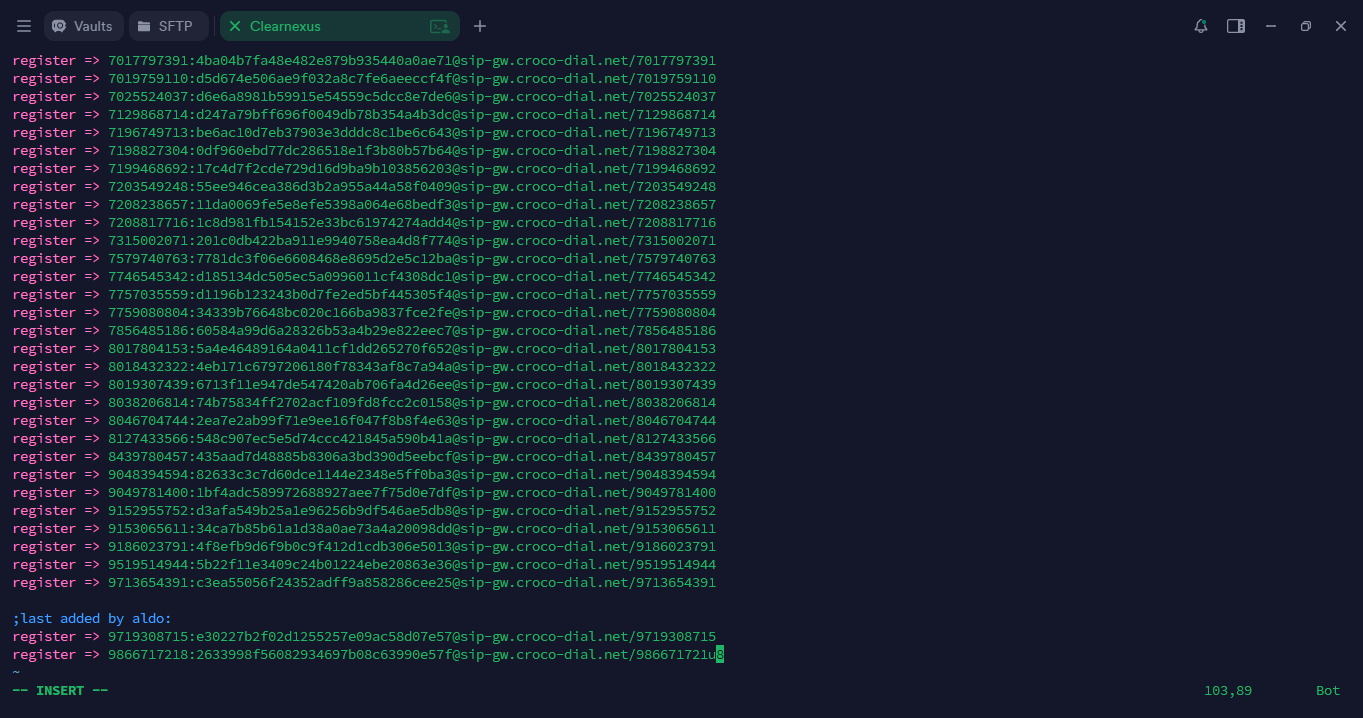
Once inside, you will see all the registration records that have been created within the system at that path. There are two possible actions you can take:

1. Press the **“I”** key. The word **“INSERT”** will appear at the bottom of the screen, allowing you to add the registration entries exactly as they were configured in the extension.
2. To exit **insert mode**, press the **“Esc”** key. The word **“INSERT”** will disappear, indicating that you can now exit the file.

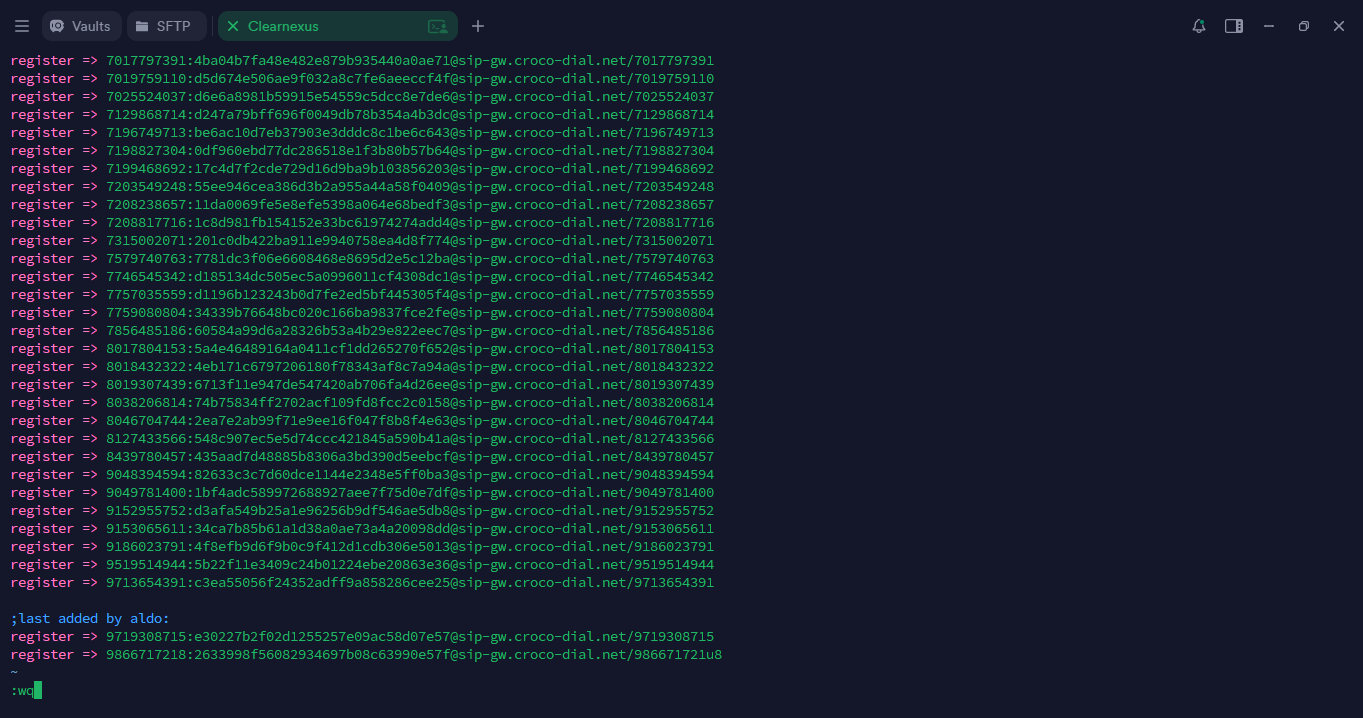
To save your changes and exit the terminal path, type the following command:

<div class="contain-inline-size rounded-2xl relative bg-token-sidebar-surface-primary" id="bkmrk-%3Awq"><div class="sticky top-9"><div class="absolute end-0 bottom-0 flex h-9 items-center pe-2"><div class="bg-token-bg-elevated-secondary text-token-text-secondary flex items-center gap-4 rounded-sm px-2 font-sans text-xs">  
</div></div></div><div class="overflow-y-auto p-4" dir="ltr">`<span class="hljs-symbol">:wq</span>`</div></div>[![image.png](https://wiki.croco-dial.net/uploads/images/gallery/2025-11/scaled-1680-/cuVimage.png)](https://wiki.croco-dial.net/uploads/images/gallery/2025-11/cuVimage.png)

[![image.png](https://wiki.croco-dial.net/uploads/images/gallery/2025-11/scaled-1680-/Ku1image.png)](https://wiki.croco-dial.net/uploads/images/gallery/2025-11/Ku1image.png)

<article class="text-token-text-primary w-full focus:outline-none [--shadow-height:45px] has-data-writing-block:pointer-events-none has-data-writing-block:-mt-(--shadow-height) has-data-writing-block:pt-(--shadow-height) [&:has([data-writing-block])>*]:pointer-events-auto [content-visibility:auto] supports-[content-visibility:auto]:[contain-intrinsic-size:auto_100lvh] scroll-mt-[calc(var(--header-height)+min(200px,max(70px,20svh)))]" data-scroll-anchor="true" data-testid="conversation-turn-8" data-turn="assistant" data-turn-id="request-WEB:6513b70d-6037-4add-ac0b-604ac86c365d-3" dir="auto" id="bkmrk-once-back-at-the-mai" tabindex="-1">
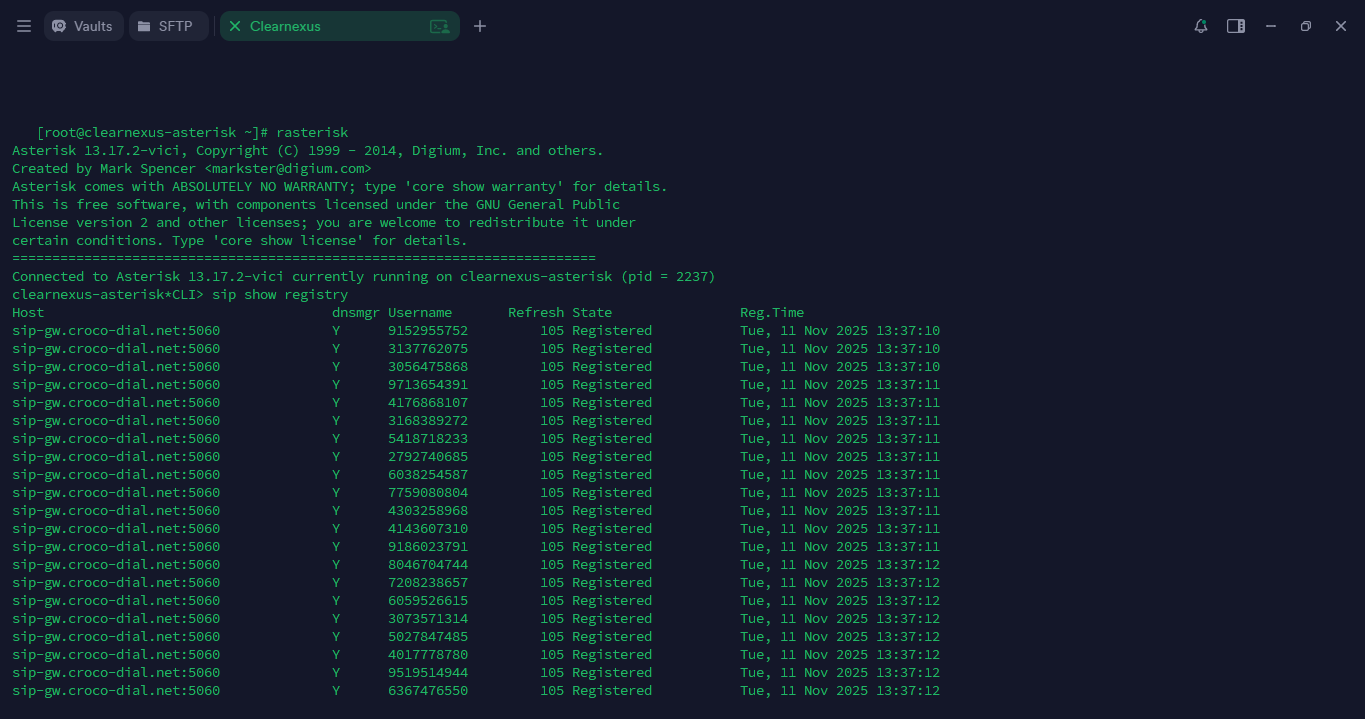
Once back at the main terminal, you will need to verify that the **DIDs** have been added correctly. To do this, you must access **Asterisk** by typing the following command in the terminal:

<div class="text-base my-auto mx-auto pb-10 [--thread-content-margin:--spacing(4)] thread-sm:[--thread-content-margin:--spacing(6)] thread-lg:[--thread-content-margin:--spacing(16)] px-(--thread-content-margin)"><div class="[--thread-content-max-width:40rem] thread-lg:[--thread-content-max-width:48rem] mx-auto max-w-(--thread-content-max-width) flex-1 group/turn-messages focus-visible:outline-hidden relative flex w-full min-w-0 flex-col agent-turn" tabindex="-1"><div class="flex max-w-full flex-col grow"><div class="min-h-8 text-message relative flex w-full flex-col items-end gap-2 text-start break-words whitespace-normal [.text-message+&]:mt-1" data-message-author-role="assistant" data-message-id="0a4a156d-ca5e-4f9b-ab0c-aae9560ba949" data-message-model-slug="gpt-5" dir="auto"><div class="flex w-full flex-col gap-1 empty:hidden first:pt-[1px]"><div class="markdown prose dark:prose-invert w-full break-words light markdown-new-styling"><div class="contain-inline-size rounded-2xl relative bg-token-sidebar-surface-primary"><div class="sticky top-9"><div class="absolute end-0 bottom-0 flex h-9 items-center pe-2"><div class="bg-token-bg-elevated-secondary text-token-text-secondary flex items-center gap-4 rounded-sm px-2 font-sans text-xs">  
</div></div></div><div class="overflow-y-auto p-4" dir="ltr">`<span class="hljs-attribute">rasterisk</span>`</div></div></div></div></div></div></div></div>To confirm that you are inside Asterisk, the terminal prompt should now display:

<div class="text-base my-auto mx-auto pb-10 [--thread-content-margin:--spacing(4)] thread-sm:[--thread-content-margin:--spacing(6)] thread-lg:[--thread-content-margin:--spacing(16)] px-(--thread-content-margin)"><div class="[--thread-content-max-width:40rem] thread-lg:[--thread-content-max-width:48rem] mx-auto max-w-(--thread-content-max-width) flex-1 group/turn-messages focus-visible:outline-hidden relative flex w-full min-w-0 flex-col agent-turn" tabindex="-1"><div class="flex max-w-full flex-col grow"><div class="min-h-8 text-message relative flex w-full flex-col items-end gap-2 text-start break-words whitespace-normal [.text-message+&]:mt-1" data-message-author-role="assistant" data-message-id="0a4a156d-ca5e-4f9b-ab0c-aae9560ba949" data-message-model-slug="gpt-5" dir="auto"><div class="flex w-full flex-col gap-1 empty:hidden first:pt-[1px]"><div class="markdown prose dark:prose-invert w-full break-words light markdown-new-styling"><div class="contain-inline-size rounded-2xl relative bg-token-sidebar-surface-primary"><div class="sticky top-9"><div class="absolute end-0 bottom-0 flex h-9 items-center pe-2"><div class="bg-token-bg-elevated-secondary text-token-text-secondary flex items-center gap-4 rounded-sm px-2 font-sans text-xs">  
</div></div></div><div class="overflow-y-auto p-4" dir="ltr">`asterisk*<span class="hljs-built_in">CLI</span>>`</div></div></div></div></div></div></div></div>Next, you will check the registration lists to ensure there are no duplicates and to distinguish the newly added entries from the existing ones. Enter the following command:

<div class="text-base my-auto mx-auto pb-10 [--thread-content-margin:--spacing(4)] thread-sm:[--thread-content-margin:--spacing(6)] thread-lg:[--thread-content-margin:--spacing(16)] px-(--thread-content-margin)"><div class="[--thread-content-max-width:40rem] thread-lg:[--thread-content-max-width:48rem] mx-auto max-w-(--thread-content-max-width) flex-1 group/turn-messages focus-visible:outline-hidden relative flex w-full min-w-0 flex-col agent-turn" tabindex="-1"><div class="flex max-w-full flex-col grow"><div class="min-h-8 text-message relative flex w-full flex-col items-end gap-2 text-start break-words whitespace-normal [.text-message+&]:mt-1" data-message-author-role="assistant" data-message-id="0a4a156d-ca5e-4f9b-ab0c-aae9560ba949" data-message-model-slug="gpt-5" dir="auto"><div class="flex w-full flex-col gap-1 empty:hidden first:pt-[1px]"><div class="markdown prose dark:prose-invert w-full break-words light markdown-new-styling"><div class="contain-inline-size rounded-2xl relative bg-token-sidebar-surface-primary"><div class="sticky top-9"><div class="absolute end-0 bottom-0 flex h-9 items-center pe-2"><div class="bg-token-bg-elevated-secondary text-token-text-secondary flex items-center gap-4 rounded-sm px-2 font-sans text-xs">  
</div></div></div><div class="overflow-y-auto p-4" dir="ltr">`sip <span class="hljs-keyword">show</span> registry`</div></div></div></div></div></div></div></div>Please note that the lists may not have been updated yet—this initial check is only to compare existing and new entries. To update the lists, run the following command:

<div class="text-base my-auto mx-auto pb-10 [--thread-content-margin:--spacing(4)] thread-sm:[--thread-content-margin:--spacing(6)] thread-lg:[--thread-content-margin:--spacing(16)] px-(--thread-content-margin)"><div class="[--thread-content-max-width:40rem] thread-lg:[--thread-content-max-width:48rem] mx-auto max-w-(--thread-content-max-width) flex-1 group/turn-messages focus-visible:outline-hidden relative flex w-full min-w-0 flex-col agent-turn" tabindex="-1"><div class="flex max-w-full flex-col grow"><div class="min-h-8 text-message relative flex w-full flex-col items-end gap-2 text-start break-words whitespace-normal [.text-message+&]:mt-1" data-message-author-role="assistant" data-message-id="0a4a156d-ca5e-4f9b-ab0c-aae9560ba949" data-message-model-slug="gpt-5" dir="auto"><div class="flex w-full flex-col gap-1 empty:hidden first:pt-[1px]"><div class="markdown prose dark:prose-invert w-full break-words light markdown-new-styling"><div class="contain-inline-size rounded-2xl relative bg-token-sidebar-surface-primary"><div class="sticky top-9"><div class="absolute end-0 bottom-0 flex h-9 items-center pe-2"><div class="bg-token-bg-elevated-secondary text-token-text-secondary flex items-center gap-4 rounded-sm px-2 font-sans text-xs">  
</div></div></div><div class="overflow-y-auto p-4" dir="ltr">`<span class="hljs-attribute">sip</span> reload`</div></div></div></div></div></div></div></div>This will refresh the list with the newly added numbers. Then, run the previous command again:

<div class="text-base my-auto mx-auto pb-10 [--thread-content-margin:--spacing(4)] thread-sm:[--thread-content-margin:--spacing(6)] thread-lg:[--thread-content-margin:--spacing(16)] px-(--thread-content-margin)"><div class="[--thread-content-max-width:40rem] thread-lg:[--thread-content-max-width:48rem] mx-auto max-w-(--thread-content-max-width) flex-1 group/turn-messages focus-visible:outline-hidden relative flex w-full min-w-0 flex-col agent-turn" tabindex="-1"><div class="flex max-w-full flex-col grow"><div class="min-h-8 text-message relative flex w-full flex-col items-end gap-2 text-start break-words whitespace-normal [.text-message+&]:mt-1" data-message-author-role="assistant" data-message-id="0a4a156d-ca5e-4f9b-ab0c-aae9560ba949" data-message-model-slug="gpt-5" dir="auto"><div class="flex w-full flex-col gap-1 empty:hidden first:pt-[1px]"><div class="markdown prose dark:prose-invert w-full break-words light markdown-new-styling"><div class="contain-inline-size rounded-2xl relative bg-token-sidebar-surface-primary"><div class="sticky top-9"><div class="absolute end-0 bottom-0 flex h-9 items-center pe-2"><div class="bg-token-bg-elevated-secondary text-token-text-secondary flex items-center gap-4 rounded-sm px-2 font-sans text-xs">  
</div></div></div><div class="overflow-y-auto p-4" dir="ltr">`sip <span class="hljs-keyword">show</span> registry`</div></div></div></div></div></div></div></div>Now verify that the numbers you added appear correctly and that the **DIDs** are being processed properly.

In the **Terminus** terminal, locate the subcategories named **dnsmgr** and **refresh state**.  
All entries under these sections must display the letter **Y** and show the status **Registered**.

</article>[![image.png](https://wiki.croco-dial.net/uploads/images/gallery/2025-11/scaled-1680-/kGoimage.png)](https://wiki.croco-dial.net/uploads/images/gallery/2025-11/kGoimage.png)

<article class="text-token-text-primary w-full focus:outline-none [--shadow-height:45px] has-data-writing-block:pointer-events-none has-data-writing-block:-mt-(--shadow-height) has-data-writing-block:pt-(--shadow-height) [&:has([data-writing-block])>*]:pointer-events-auto [content-visibility:auto] supports-[content-visibility:auto]:[contain-intrinsic-size:auto_100lvh] scroll-mt-[calc(var(--header-height)+min(200px,max(70px,20svh)))]" data-scroll-anchor="true" data-testid="conversation-turn-10" data-turn="assistant" data-turn-id="request-WEB:6513b70d-6037-4add-ac0b-604ac86c365d-4" dir="auto" id="bkmrk-to-finalize-the-proc" tabindex="-1">To finalize the process, you will need to access the **EMMA** platform, where all the numbers you have registered should appear.

Once logged in, follow these steps:

<div class="text-base my-auto mx-auto pb-10 [--thread-content-margin:--spacing(4)] thread-sm:[--thread-content-margin:--spacing(6)] thread-lg:[--thread-content-margin:--spacing(16)] px-(--thread-content-margin)"><div class="[--thread-content-max-width:40rem] thread-lg:[--thread-content-max-width:48rem] mx-auto max-w-(--thread-content-max-width) flex-1 group/turn-messages focus-visible:outline-hidden relative flex w-full min-w-0 flex-col agent-turn" tabindex="-1"><div class="flex max-w-full flex-col grow"><div class="min-h-8 text-message relative flex w-full flex-col items-end gap-2 text-start break-words whitespace-normal [.text-message+&]:mt-1" data-message-author-role="assistant" data-message-id="2109b7fb-77d1-4972-a62f-6eaaebbc7b72" data-message-model-slug="gpt-5" dir="auto"><div class="flex w-full flex-col gap-1 empty:hidden first:pt-[1px]"><div class="markdown prose dark:prose-invert w-full break-words light markdown-new-styling">1. Click on the **Inbound** option.
2. Then select **Show DIDs**.
3. Review the list to ensure that all the numbers you added are displayed, that they are **activated**, and that each one has the **Call Menu** option enabled.

</div></div></div></div><div class="z-0 flex min-h-[46px] justify-start">  
</div></div></div></article>[![image.png](https://wiki.croco-dial.net/uploads/images/gallery/2025-11/scaled-1680-/IAtimage.png)](https://wiki.croco-dial.net/uploads/images/gallery/2025-11/IAtimage.png)